| < 4.5.2: Specials | 4.6: Dual Sabers > |
| 4.5.3: Combos -Janus - Apr 18 08:12pm | |||||||||||||||||||||||||||||||||||||||||||||||
|
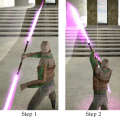
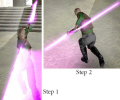
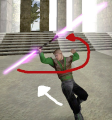
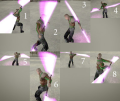
Alpha Part 1 - Basic Half Animation Staff Swings Info: Everything has a beginning. Although simplistic and seemingly childish, these build upon each other and should be taken seriously as a building block for the more difficult moves down the road. All pictures include start from this base stance. Description: When you click once and let go, not holding down the attack key (Default: left click on the mouse). The half swing comes into place when you click once along with a direction. Funny enough, sometimes that's all that is needed to make your point in a duel. Below lists the direction to push, and the resulting animation. Up and Down - The animation is an overhead swing. No matter what, they stay the same. One of the essential swings to starting off combos with the staff. Up+Right - Half Moon swing starting from top-left and finishing with the saber pointing down-right. Up+Left - Half Moon swing starting from top-right and finishing with the saber pointing down-left. Info: Both of these are good close to the opponent, and have a high percentage of hitting close to the head, and an almost perfect chance of scoring a body shot. Left - Horizontal Half Moon swing with the saber at your right and finishing at your left. The swing moves directly in front of you. Right - Horizontal Half Moon swing with the saber at your left and finishing at your right. The swing moves directly in front of you. Info: Good for when opponent is coming down with a vertical swipe. Move into your opponent and use either one of these moves. Down+Right - Half Moon swing with the saber starting at your bottom-left and ending at your top-right. Down+Left - Half Moon swing with the saber starting at your bottom-right and ending at your top-left. Info: Out of all half swing animations, the previous two mentioned are probably the most powerful. When executed upon an oncoming airborne opponent, the damage will be great. Alpha Part 2 - Full Animation Staff Swings Info: Pictures here are of the pause in between the repeated animations. This is what the user should look for when they repeat the Full Animations again and again. Red is the direction of the saber, and if there is white, the direction the user is heading. Description: When you click and hold the attack button. By holding down the attack button, you repeat the animation over and over again. Below lists the direction to push, and the resulting animation. What makes this different is that your character does a full swing, and in between does a little action which sets yourself up for the same move again, OR another direction to combo with. Up or Down - By holding down attack, you repeatedly attack with an overhead swing. One of the faster Full Animation swings. Very little pause in between. No picture required. Up+Right - With the full animation, you swing your back around, so the saber briefly goes behind you, and you repeat the animation. The pause is slow and leaves you open. Up+Left - Same applies as to the Up+Right, except for some reason, the pause in between swings is slightly longer, even more dangerous of getting yourself killed. Info: Continuing to do the above 2 moves in my opinion isn't smart. The pauses are just too long and too tempting for another person waiting to strike. Left - As you continue to move left and hold down attack, you turn around with a pause, skip on your feet a bit then repeat. The saber stays to your front and slightly above your waist. It's good to throw off an opponent timing-wise. Right - Upon holding down the attack, you automatically spin one handed the staff above your head like a helicopter, and as the animation ends, the spinning continues working its way down vertically. The body spins and the hand goes up repeating the move. The saber spins more times then if you did the left animation, which can lead to more damage. Info: I find alternating between the both of the Left and Right animations extremely effective against other staffers and dual users. Especially when your opponent uses the left to right combo repeatedly. Down+Right - You slash up from your Left-Down to your Top-Right. After the animation finishes, you toss the saber up spin around and repeat. It leaves you open, but is used as the beginning for the “Behind Back” 2-Part Combo Down+Left - This is a weird one. Still not effective repeated over and over, you slash from Right-Down to Top-Right, spin and skip and repeat the move. Info: To continue to hold down attack with the same direction isn't effective, but I listed these to explain what happens in between. Beta - Basic Combos Info: These are basic beginning combos when beginning with staff. I strongly recommend looking at the corresponding pictures on the right. Description: Directions are as follows: Up = Moving forward, Down = Moving back, Left = Strafing Left, Right = Strafing Right. Defaults are Attack = left click, Alternate Attack = right click. 3 Starter Combos Combos can be done going either way as your starting point. Example, the first combo listed below, you can start with Up+Right then go Up+Left Up+Left to Up+Right (Combo 1) - The combo is essentially a figure 8 movement with the saber, where your going back and forth in a flowing manner. It isn't a jagged quick left and right, but one flows right into the next. One way to unleash an offensive. You are moving forward at this point, control where you go with the mouse though. The fighter can continue to do this combo, and move freely by moving the mouse towards where they want to go. Left to Right (Combo 2) - Sounds easy enough, but I've seen many not get it right away. You start off going one of the directions, and when the saber reaches the maximum time of the animation, for instance a right swing, and the saber is at the most right it can be, move in the opposite direction, in this case go left. It creates a quick back and forth in front of you. This combo too can be done repeatedly back and forth. Good for when someone is invading your personal space. Down+Right to Down+Left (Combo 3) - In Combo 1 you move forward and alternate left to right. For Combo 3 you move backwards and alternate left to right. Although slightly slower than the moving forward of Combo 1, opponents jumping toward you will learn to watch for this after seeing how much damage it can do. 4-Point Combo (Combo 4) **advanced** Down+Right to Up+Left OR Down+Left to Up+Right OR Up+Left to Down+Right OR Up+Right to Down+Left (phew, say that all in one breath) This combo can be executed going from any of the directions stated above, but to follow it up with its 2nd half, the opposite direction needs to be pressed. It will basically be just like a Left to Right back and forth style, but it emphasizes the diagonal directions. This move is VERY versatile in terms of dueling another. The bounce back or forward isn't the usual expected response, therefore giving an edge of surprise on the opponent. Info: For the set of pictures, I’m illustrating the Up+Left to Down+Right Combo. Side Combos Info: These are 3 direction combos that will cause different animations to be made from the character. Some look cool, some can be damaging, and others are just useless (at least to my knowledge). Behind The Back Spin - Start with Down+Right animation. Timing is key here, once the upward slash is executed, before it repeats the animation, continue to hold Attack and strafe Right. A new animation occurs where you spin the saber around you and around your back. It's a good slashing technique but leaves your front open when the saber goes behind you. Use this sparingly... Turnaround Counter Spin - Start with the Up+Right animation. Once the first part of the slash occurs, strafe Right while holding Attack down. The character will animate a spin around to the left with the saber in front. Once that part of the animation holds, you can move the character whichever direction you want. This move can come as unexpected! Ascending Helicopter Spin - Down+Left executes the first part of this slash. At the peak of the slash continue to hold attack and move the directions pressed to Up+Left. You will proceed to spin the saber around counter-clockwise up and over your head, finishing with a slash downward and to the left. The swing hits a lot of upper and lower area, but when you leave your back open, you will be susceptible to getting it. Elevated Helicopter Spin - This move is done pressing down+jump+attack all at once. Don’t hold it down when pressing, more like a press and release after about half a second. You turn yourself upside down in mid-air and spin the saber helicopter style underneath. Does damage in midair but has no real use. **Optional Slash (After Elevated Helicopter Spin)** - Continue to hold attack after you land. Staff saber version of a Red (Strong) Single saber attack. |
|
||||||||||||||||||||||||||||||||||||||||||||||
| Login and add your comment! |
| Comments |
|
Deraj Leahpar - Student |
in the jedi academy game booklet, it mentions that if you gg forward and do secondary attack you will do a saberstaff hilt bash, but all it does is just make you kick, why is that? _______________ "Do or Do not. There is no try"- Master yoda |
|
^Methos - Student |
for the Optional Slash (After Elevated Helicopter Spin), if you add a small hop right when the slash starts, you have a fairly good chance of hitting people above their defenses. If you hit them at all that is _______________ It takes courage to grow up, and become who you really are. "The whole secret of existence is to have no fear. Never fear what will become of you, depend on no one. Only the moment you reject all help are you freed." |
|
bono_bob - Student |
IF you run forwaord and quickly do this move you can do the maneuver while doing this move, which can prove usefull for a quicky easy height jump that requires no force, also many times I have done this move to someone when they were air born and it instantly killed them. _______________ "Darkness is simply the absence of Light" "Is it not easier to snuff out the light completely than to make no shadow or darknes at all and create pure light?" "Is there a limit to Light?" - Jawa Jedi from a galaxy far far way of the one Lucas describes ( not in that galaxy ) |
|
Storm - Ex-Student 
|
hey thanks for putting this together its really helpful _______________ Storm |
| Login and add your comment! |


